Google Tag Manager. How to use it to configure Google Analytics and Google Ads? Full tutorial.
When we launch a new commercial website, one of the things that is given the least attention is the follow-up.
It is essential to analyse what users do, what works and what does not.
On average, companies change their website every 3 years. If we haven't analysed what works for us, we will make the same mistakes again.
Whether we are doing paid CPC advertising on Google Ads or any other marketing action, we need to make sure that we will be able to track every conversion correctly through Google Analytics and Tags.
Summary: What you will learn about Google Tag Manager in this comprehensive tutorial.
- 1. What is Google Tag Manager?
- 2. How to check if the website already has Google Tag Manager installed?
- 3. Create a Google Tag Manager account and install it on the website
- 4. Google Tag Manager. Complete step-by-step tutorial for setting up tags, triggers and variables.
What is Google Tag Manager?
Google Tag Manager is an integrated Google tool that helps us track the performance of our website without having to ask the technical team to include code for every new conversion we want to track.
The GTM must be installed by someone who has access to the code. Once it is installed, we can install everything else from the Google Tag Managercontainer.
How do I check if the website already has Google Tag Manager installed?
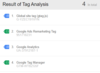
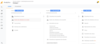
I recommend that you download the Google Tag Assistant chrome extension. Once you have it, make sure you have these four tags installed.
1. Google Analytics
2. Google Tag Manager
3. Global site tag
4. Google Ads Remarketing Tag (if you remarket with Google Ads)
The colours indicate whether the installation is correct or whether there is an error.
Blue and green means that it is correctly installed and working.
Red and yellow: something you need to fix
You can have several analysis codes installed, but it is better to have only one GTM to avoid overloading the page and slowing it down.
Create a Google Tag Manager account and install it on your website
This is the process I use to install GTM before launching my Adwords campaigns.
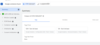
Go to the Google Tag Manager,
You will be asked to create an account
All you have to do is accept the terms of use.
My old site was built on WIX. It doesn't matter which CMS you use. In any case, put yourself in developer mode so you can paste the code.
Google Tag Manager has a quick start guide here
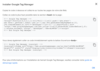
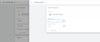
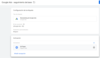
If you use WIX, you don't need to paste the code. It just asks you to add your Google Tag Manager reference here:
Click on GTM and add the code you see on the right GTM- XXX

Google Tag Manager. Complete step-by-step tutorial for setting up tags, triggers and variables.
When setting up Google Tag Manager, I recommend that you have the following tools open:
- Google Analytics
- Google Tag Manager
- Google Ads for the account in question
- The website for which you are setting up conversions.
- GTM checklist that you can download in this article.
Before you begin, you need to understand the basics that will help you set up the code in Google Tag Manager in a comprehensive way.
In short, you should stick to these concepts:
- Tags: what is being executed
- Triggers: when executed
- Variables: specific cases
Activate the variables
We will enable all the most common variables so that they can be selected when setting up tags and triggers.
A variable is simply a value that changes.
Tag Manager provides a set of built-in variables that are commonly used in containers, but also gives you the ability to create variables to meet your specific needs.
Google Tag Manager variables have the same function and are used to trigger a GTM trigger when a value changes, my URL containing /formform among others now contains /thank you. In this case, the trigger will fire the tag: Form submitted successfully.
It can also be used to capture dynamic values in tags, such as the amount of the purchase made, in order to properly track the ROI of the conversion.
We activate all the variables we are interested in (without deleting the default variables).
That is: clicks, forms, videos, page scrolling or even visibility.
This will help us later.

Select triggers
Before I reveal whattags are, I'll explain whattriggers are.
They are essential, as they define when the code should be executed on the web (through the tags). Tags must have at least one trigger to be activated.
Google Tag Manager triggers detect certain types of events on web pages or in mobile applications, such as form submissions, button clicks, or page views. When the trigger detects the specified event, it tells the tag to activate.
Triggers will be selected each time you set up a tag.
Create your tags
These tags will help us send data to Google Ads and Google Analytics.
Tags are pieces of code that are executed in our web or mobile application through triggers when a function has been completed.
The triggers told us when to run and the beacon told us what to run.
Google explains very well the components of Google Tag Manager here.
Now let's get down to business. We are going to configure the tracking of our website with Google Tag Manager.
Install the Analytics and Google Ads tracking code with GTM
Install Google Analytics tracking
Before continuing :
Check that you have access to the Google Analytics account.
Is this not the case?
1. Website with some age. Try as much as possible to get access to your Analytics account as you have valuable data in there.
2. New website. If your site is fairly new, and the person who created and implemented it for you has not given you access (this can happen), don't panic. You can create and install a new Google Analytics tracker. Here's how to do it:
- You can do it now, Create a Google Analytics account by following this easy guide.
- Next, we will install the Analytics tracking code using Google Tag Manager
Important: Simply ask your site's code manager to uninstall the old Google Analytics. Two codes will cause problems!
Let's see how to use a tag to start Analytics tracking.
If we have not yet installed anyanalytics tools, we will do so with Google Tag Manager.
Install the old Google Analytics tracking
We will create the tag that we will use to track the analytical base.
This is equivalent to having inserted the Google Analytics code on each of our website pages.
We avoid having to enter the code manually several times. On the contrary, it saves us and the IT specialist from having to check when it can be done in the middle of all the important developments.
If you don't have a Google Analytics account you need to create one;). It is free, like almost all Google tools.
Now log in to Google Analytics and from the admin page you can retrieve the tracking ID from the property bar - tracking code.
We will create the tag in GTM and in the triggers we will ask it to be activated on all pages.
That is, implement the analysis code on all pages.
We have avoided copy and paste code on all pages.
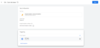
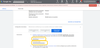
To arrive at the image below you will :
1. Create a new Google Tag Manager (Tag)
2. Select by default: Universal Analytics
3. Google Analytics settings : New variable > Tracking ID filled with the UA- XXXX code of your account
4. Trigger : All pages viewed.
And so we create several tags depending on what we want to measure.
Install the new Google Analytics 4 (GA4) tracking
Check your first Google Tag Manager tags
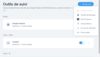
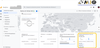
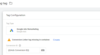
Before sending a tag to production, check that the tags are triggered using the 'preview' tool google tag manager.
You should see your tags in the Tags Fired.
Here is an example for Analytics tracking tags but it applies to all future tags you will implement on your GTM container.
Installing the Google Ads tag with GTM
You have two ways to manage your Google Ads campaigns.
1. Google Ads without good conversion tracking, and in this case, be prepared for this:
2. Google Ads with impeccable tracking. And, it would look like this for you (instead of Google).
- Fully cost effective for your business
- Qualified traffic to your site
- A turnover that increases thanks to Google Ads.
Install Google Ads conversion tracking with GTM
Now that you've made the right decision for your business, let's create the basic Google Ads tracking tag.
We're also going to apply it to all the pages on our website. Well, in all those where we have installed our Google Tag Manager container, of course.
It would look like this.
note : Google Ads - ID is not a default variable, but a custom constant I created with the Google Ads ID.
To find your account's Google Ads ID or Google Ads Conversion ID you need to set up at least one initial conversion in your Google Ads interface.
The conversion ID will be constant for all conversions in your account.
The conversionlabel is specific to each conversion, it is a dedicated identifier.
Creating the Google Ads Conversion Linker
When you create your Google Ads Remarketing Tag, it will warn you to create your conversion Linker. Go for it without fear. It's important to do so.
You just have to click on Create and apply it to all the pages you see.